2009 Honda CRV Transmission Fluid Capacity
When it comes to maintaining your 2009 Honda CRV, one of the essential tasks is checking and changing the transmission fluid. The transmission fluid plays a vital role in keeping your vehicle’s transmission running smoothly and efficiently. In this article, we will discuss the transmission fluid capacity for the 2009 Honda CRV, so you can ensure that you have the right amount of fluid to keep your vehicle in top shape.
Transmission Fluid Capacity and Type
| Popular posts |
|---|
| What to do to prolong the life of your manual gearbox |
| Automatic transmission: what it is, how it works |
Before we dive into the details, let’s take a look at the transmission fluid capacity and type for the 2009 Honda CRV. It’s crucial to use the correct type and amount of fluid to avoid any potential issues. Here’s a handy table to guide you:
| Transmission Fluid Capacity | Transmission Fluid Type |
|---|---|
| 2.5 quarts (2.4 liters) | Honda ATF DW-1 |
Now that you know the transmission fluid capacity and type, let’s move on to the steps to check and change the fluid.
Checking and Changing the Transmission Fluid
- Make sure your vehicle is on a level surface and the engine is warmed up. This will ensure an accurate reading of the fluid level.
- Locate the transmission dipstick. It is usually labeled and can be found near the back of the engine compartment.
- Remove the dipstick and wipe it clean with a lint-free cloth or paper towel.
- Reinsert the dipstick fully and then remove it again to check the fluid level. The dipstick will have markings indicating the proper fluid level range. Ensure that the fluid level is within this range.
- If the fluid level is low, you will need to add the appropriate amount of transmission fluid. Use a funnel to avoid spills and pour the fluid slowly. Be cautious not to overfill.
- If you need to change the transmission fluid, locate the transmission drain plug underneath the vehicle. Place a drain pan underneath to catch the old fluid.
- Remove the drain plug and allow the old fluid to drain completely.
- Once the old fluid has drained, reinstall the drain plug and tighten it securely.
- Locate the transmission fill plug, which is usually on the side of the transmission. Use a funnel to pour the new transmission fluid into the fill hole. Refer to the table above for the correct fluid capacity.
- After adding the fluid, reinstall the fill plug and tighten it securely.
- Start the engine and let it idle for a few minutes. Shift through each gear position, pausing for a few seconds in each, to allow the fluid to circulate.
- Finally, recheck the fluid level using the dipstick and ensure it is within the proper range.
Remember, it’s essential to follow these steps carefully and use the correct transmission fluid to maintain the performance and longevity of your 2009 Honda CRV’s transmission. Regularly checking and changing the transmission fluid will help prevent costly repairs and keep your vehicle running smoothly for years to come.
Author

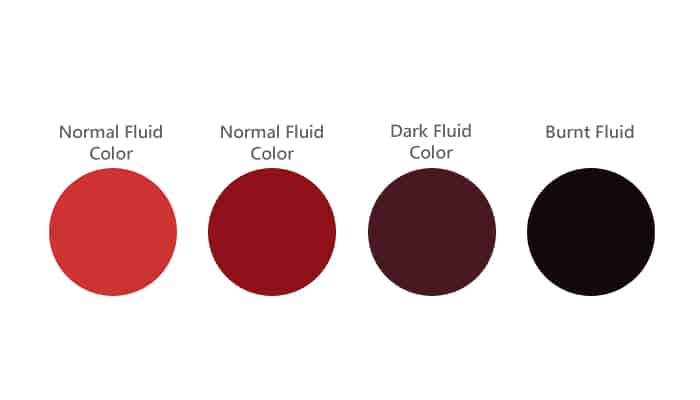
What Color Should Transmission Fluid Be?